Getting started
ScrambleID allows you to sign in securely using your trusted mobile device — no usernames, no passwords. Simply scan and go for a fast, seamless authentication experience.
If you received a ScrambleID invitation email from your organization with a six-digit activation code, download and install the ScrambleID app for Android or iOS then register in the app to get started. It only takes a few minutes.
ℹ️ Already a user?
If you already have a ScrambleID account, open the app and tap Existing on the Welcome screen. See the Existing user options section for more information.
Set up your ScrambleID account
- Your Apple or Android smartphone

What you’ll need
- Your Apple or Android smartphone
- Access your organization email for the invitation
The first step after you download and install the app is to register as a new user.
Open the app and tap New on the Welcome screen; then follow the registration instructions on the next page.
Register as a new user
After tapping New on the Welcome screen, Register by simply scanning the QR code.
Or
By entering your business email and the six-digit activation code from your welcome email.


Enter business email
1. Enter your business email.
2. Tap Next.

Enter Activation Code
1. Enter your Activation Code
2. Tap Next.

Enter alternate email
1. Enter your alternate email
2. Tap Next.

Enter Mobile Number
1. Enter your Mobile Number
2.Tap Next
* If your activation code has expired, contact your help desk to request a replacement. Once your new code arrives via email, simply restart the registration process.

Accept the terms & conditions
1. Read Terms of Service and Privacy Policy; then tap the checkbox to agree.
2. Tap Accept & Agree.

Create profile
1. ScrambleID sends a text message with a six-digit registration code to the cell number you entered on the previous screen.
* Tap Resend if you don’t get the code within 60 seconds.
2. Enter the code (it may auto-populate for you).
3. Tap Verify code.
4. If you want to edit your mobile number click Change Number and repeat the above steps.
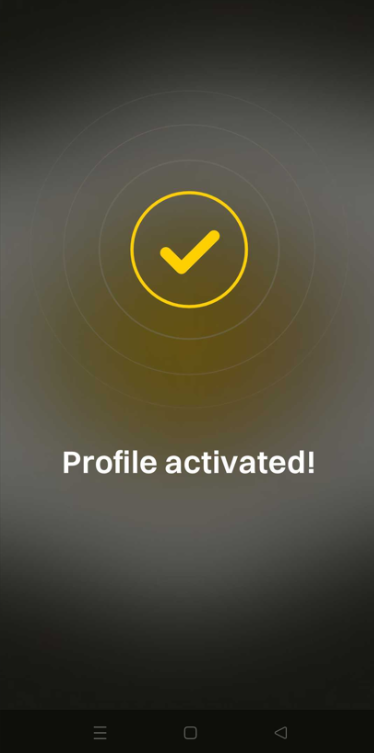
You will receive a confirmation that your ScrambleID Profile has been activated.
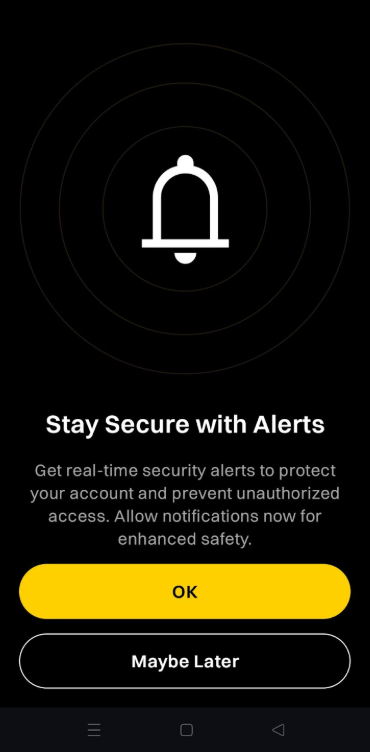
Select OK to get real time security alerts on your device.
Select Maybe Later option, If you do not wish to receive notifications at this point.
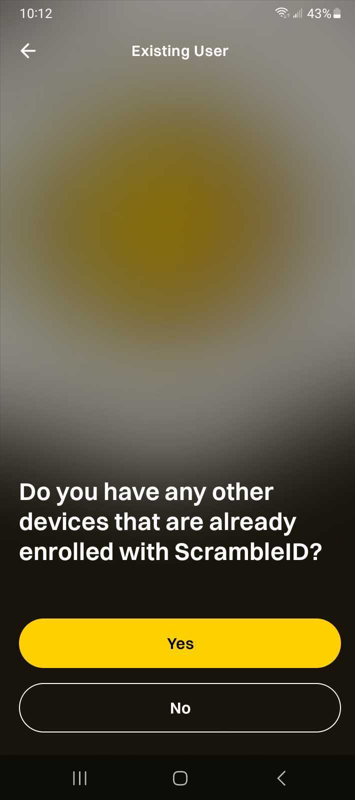
Existing user options
If you already have a ScrambleID account and want to register this new device, open the app and tap Existing on the Welcome screen. When the Existing User screen opens, tap to answer the question: Do you have any other devices already enrolled with ScrambleID?

Tap Yes if you have another registered device handy and see Adding a new device for further instructions
Otherwise, tap No if you need help getting a registration code
The Lost Device screen appears with instructions for contacting your help desk to get an activation code.

When you receive your activation code, tap Continue and enter it on the Register screen.
Note: When you add new devices using an existing device, ScrambleID always gives you the option to scan the QR code or enter the six-digit authorization code. Either option completes registration – feel free to choose the one that works best for you!
Using the app
Once your device is registered, your account is authenticated and ready for use. You can now use the app to add other devices.
Note that now that you’re registered, the User profile menu appears at the top- right of the screen.
Authentication
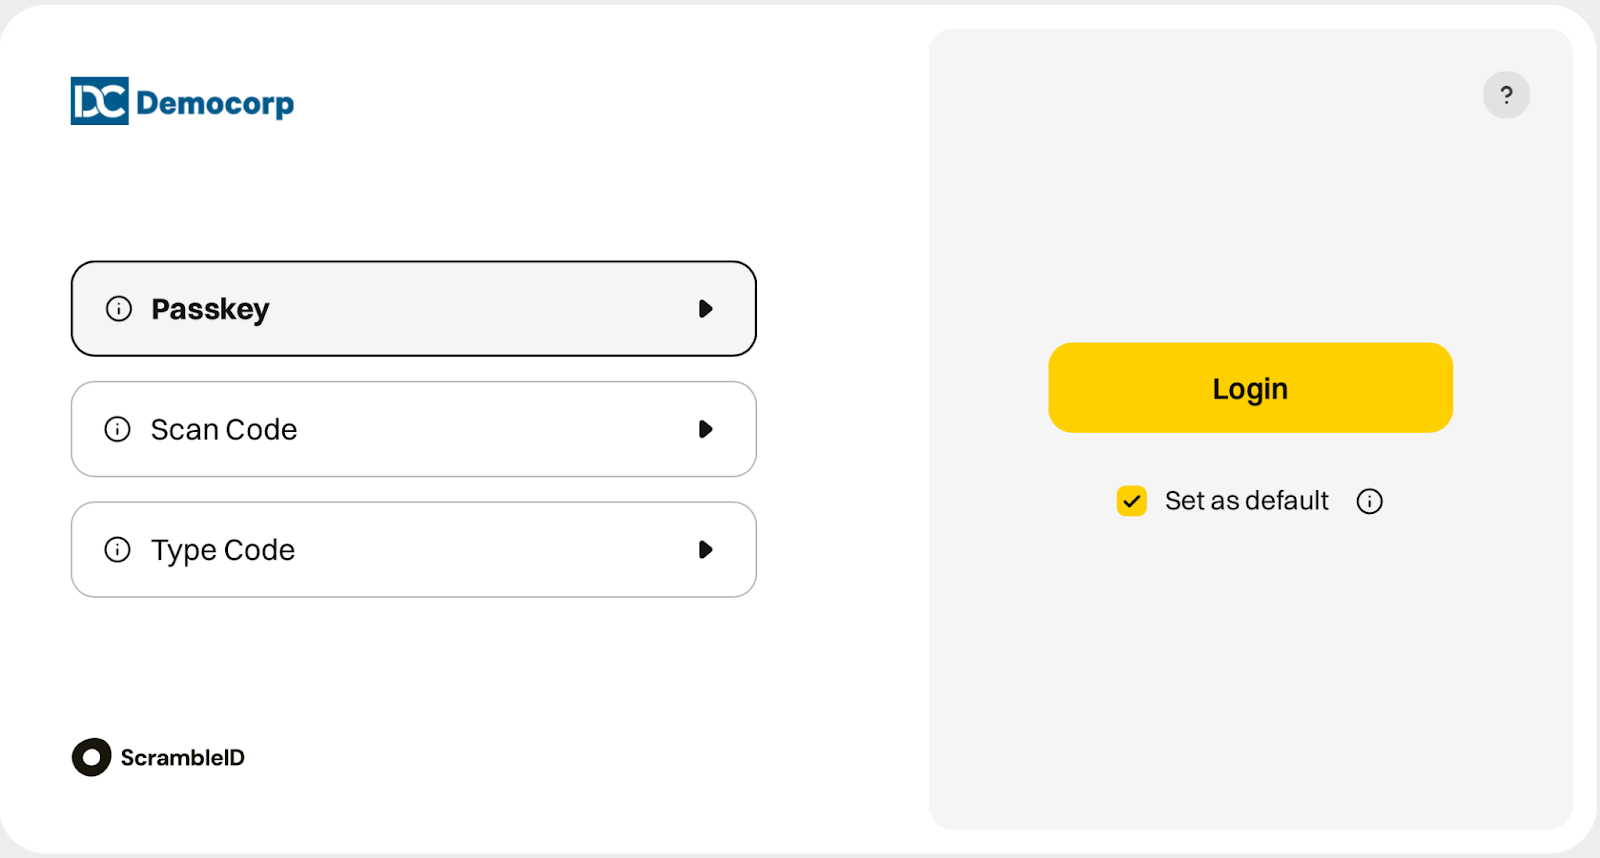
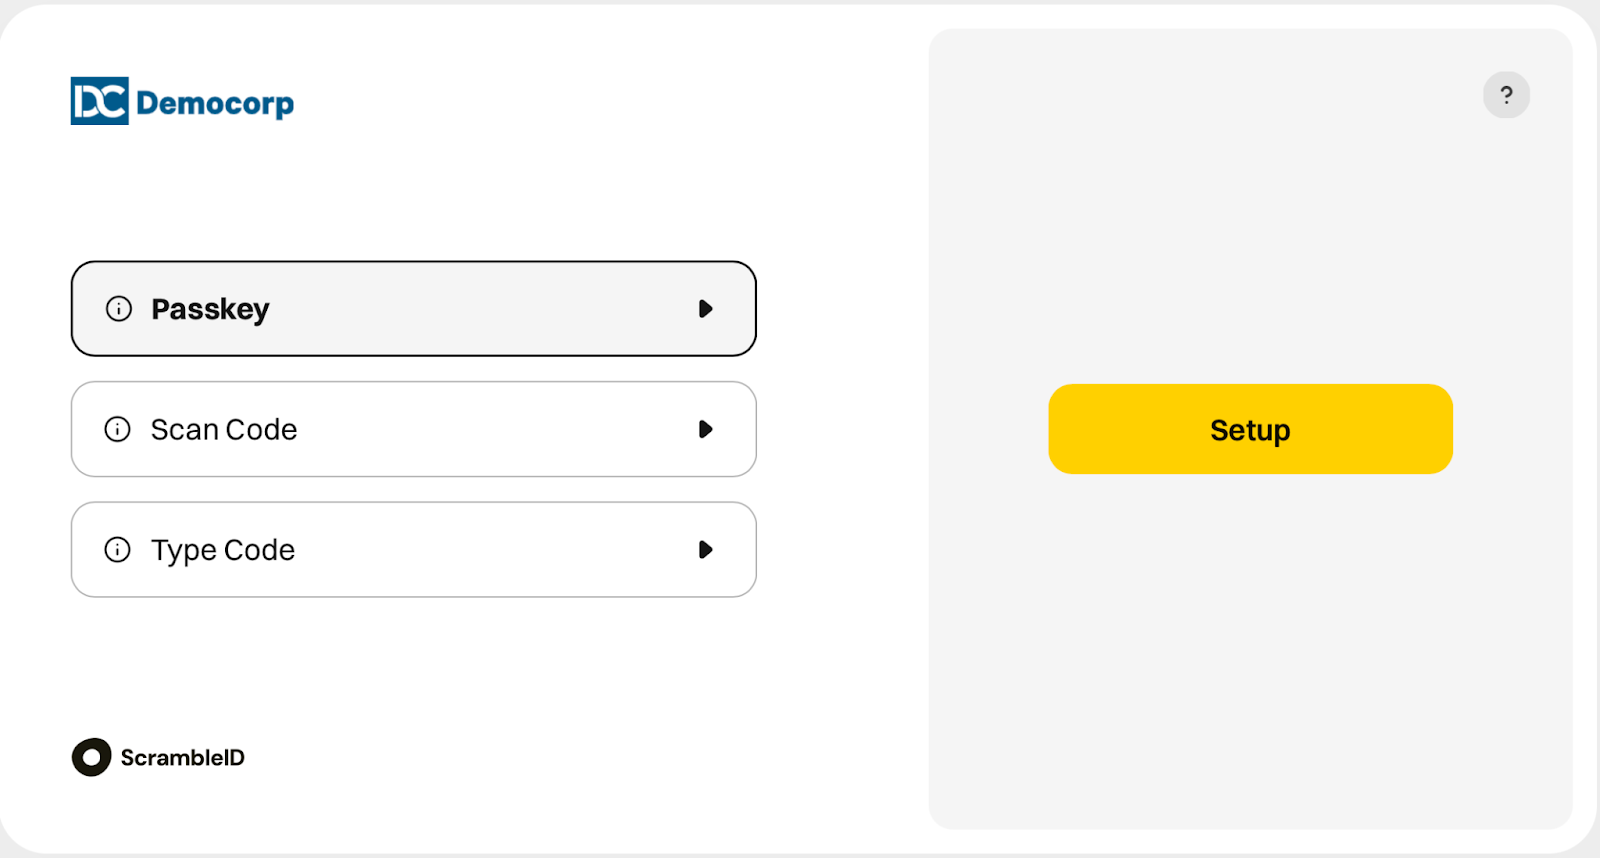
There are three ways to securely sign in using ScrambleID. To begin, open the app and choose your preferred method:
1. Scan the QR code.
Note: If the code is not scanned before the timer expires, you must click Refresh Code to receive a new QR code.

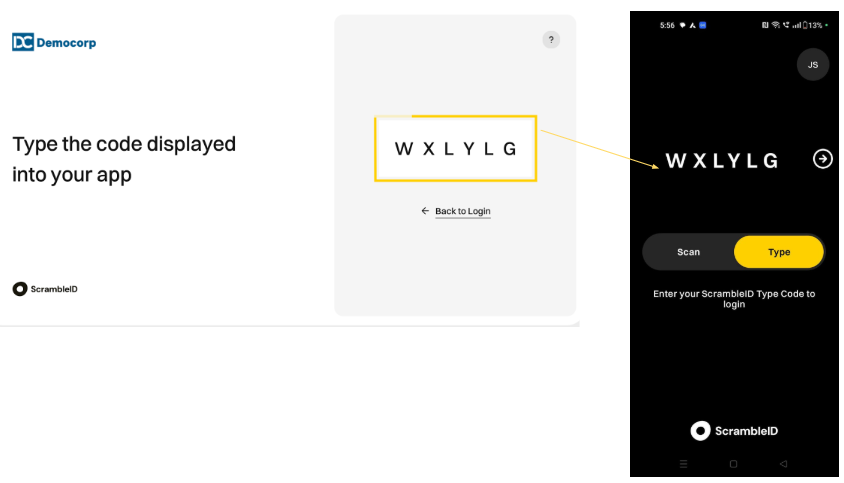
2. Click Type Code and manually enter the six-digit code displayed into your device.
Note: If the code is not entered before the timer expires, you must click Refresh Code to receive a new code.

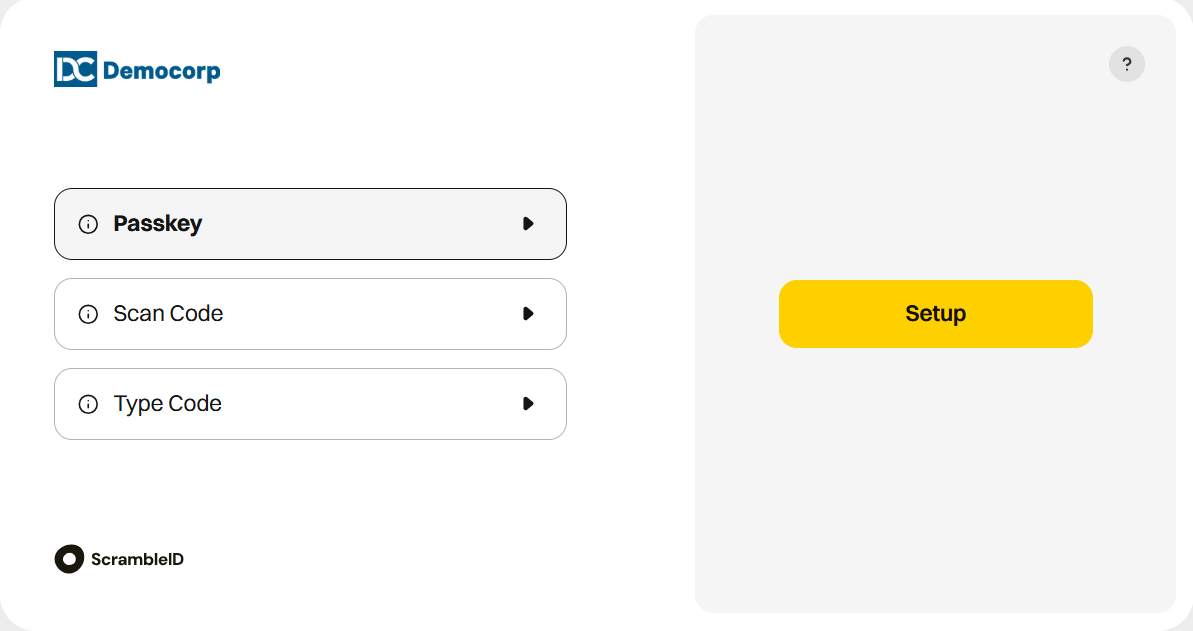
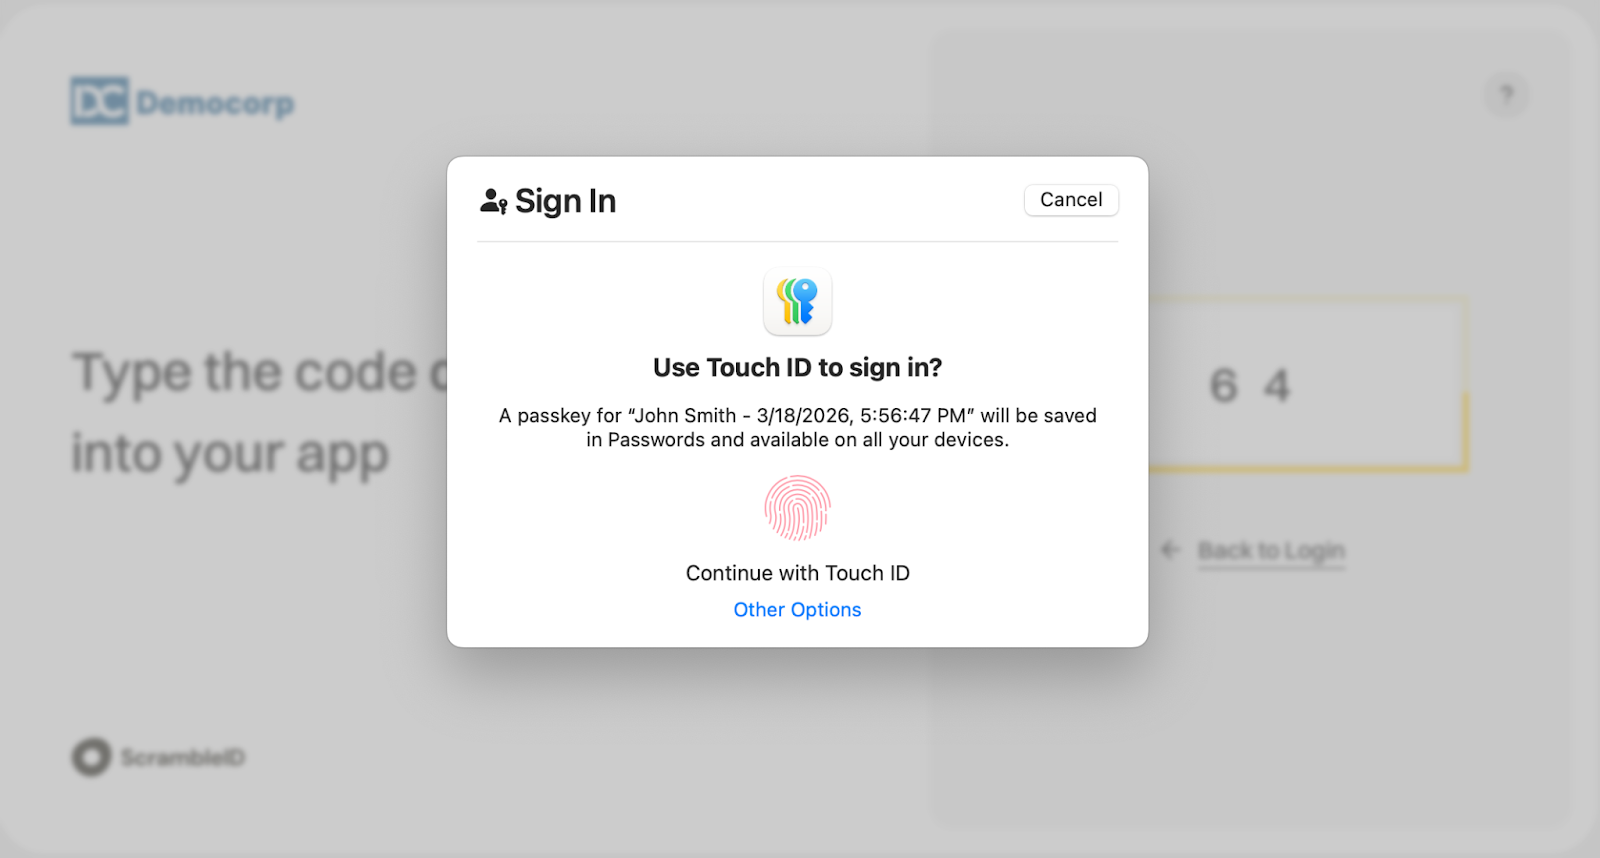
3. Passkey Authentication may also be available for your device. Passkey Authentication is dependent on the specific device hardware and software. You must set up Passkey Authentication first before you can login with this option. To set up, you need a device that is already registered with ScrambleID.
Note: Windows workstations require Windows Hello and Apple Mac workstations require TouchID to be enabled for Passkey authentication
Setting up Passkey on Windows OS
ScrambleID uses your mobile device to authorize Passkey login on your workstation. The Passkey itself is managed by your operating system (Windows Hello).
In order to set up Passkey, tap the Setup button on the login screen.

Enter the additional two-digit code into the mobile app, then click Verify.

Set the Passkey to complete the setup.
Note: There are options on the system to set up a passkey of your choice for example your fingerprint, facial recognition, or PIN.
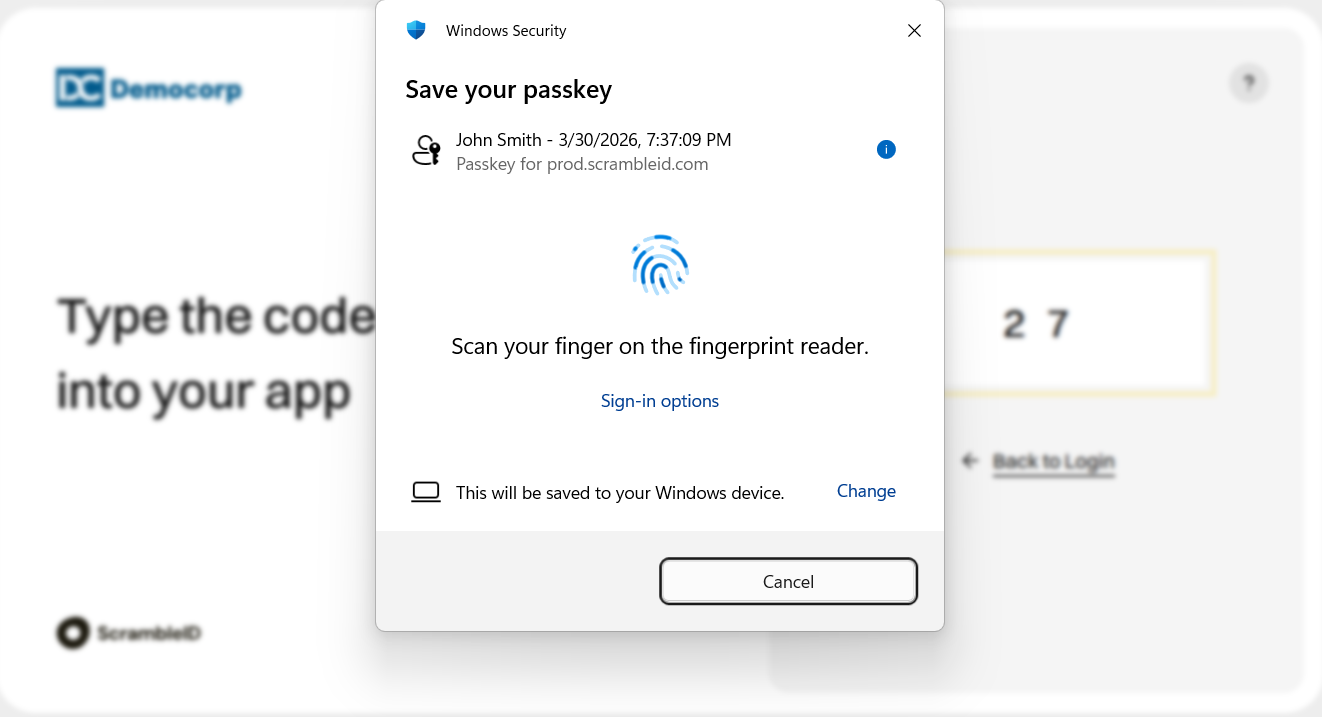
Setting up your Passkey using the fingerprint option:
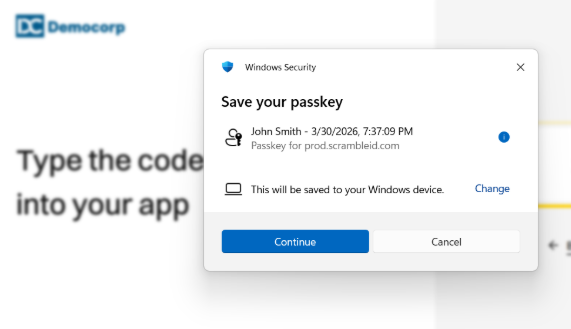
Hit Continue.
The Passkey will now be saved on your Windows device.
You will receive a confirmation on the portal screen that the setup is complete.
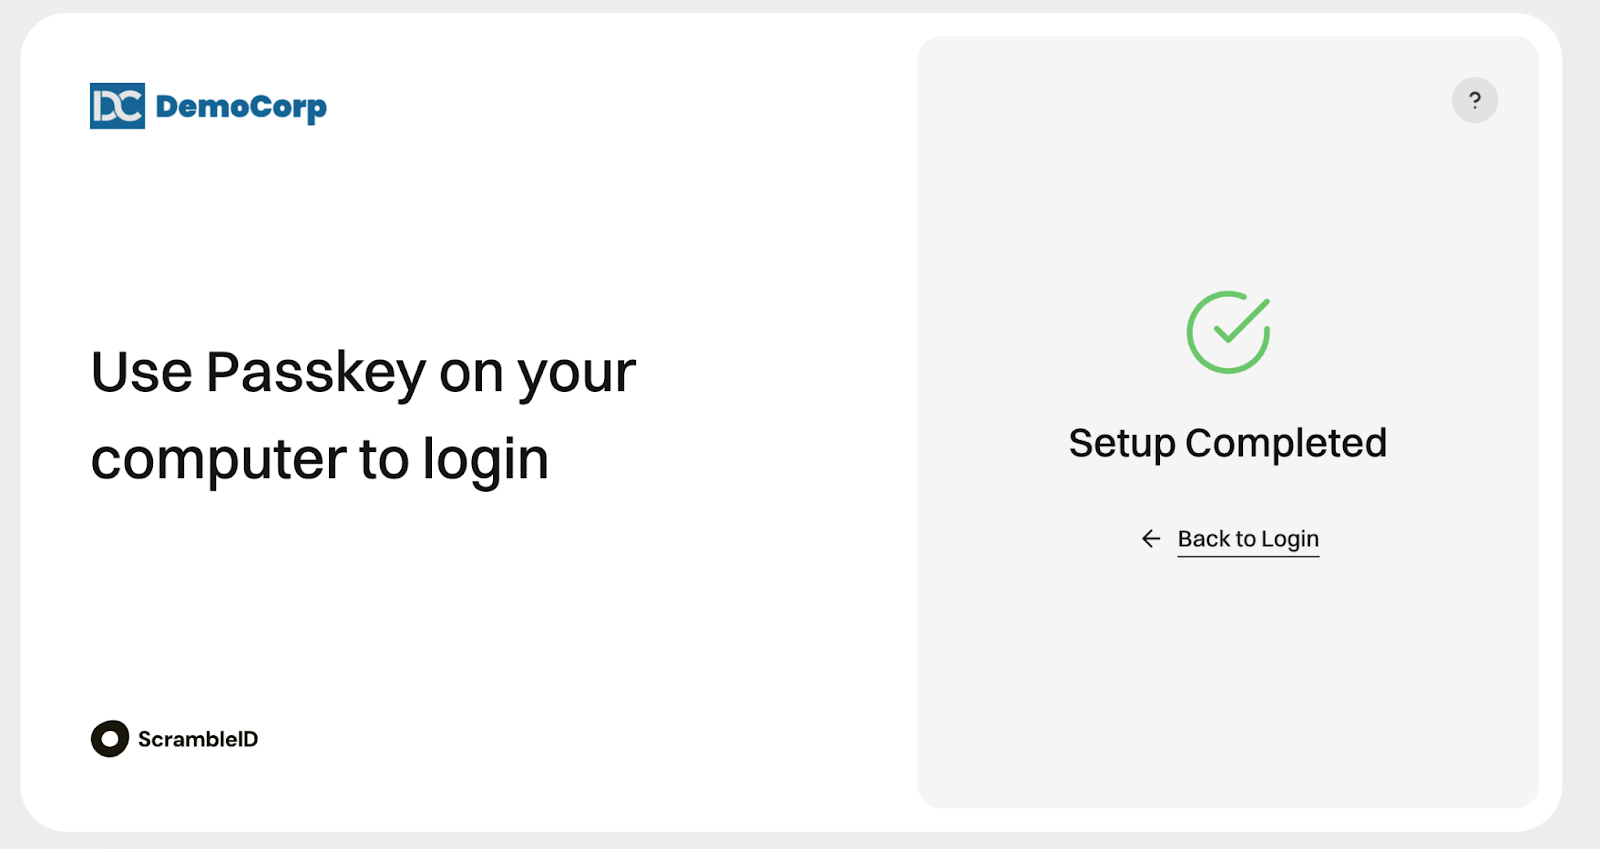
On clicking Back to Login, you will now be able to login using the Passkey set up on your laptop or computer.
Note: This may take a few seconds.

You will now be able to log in using the saved passkey i.e. your fingerprint.
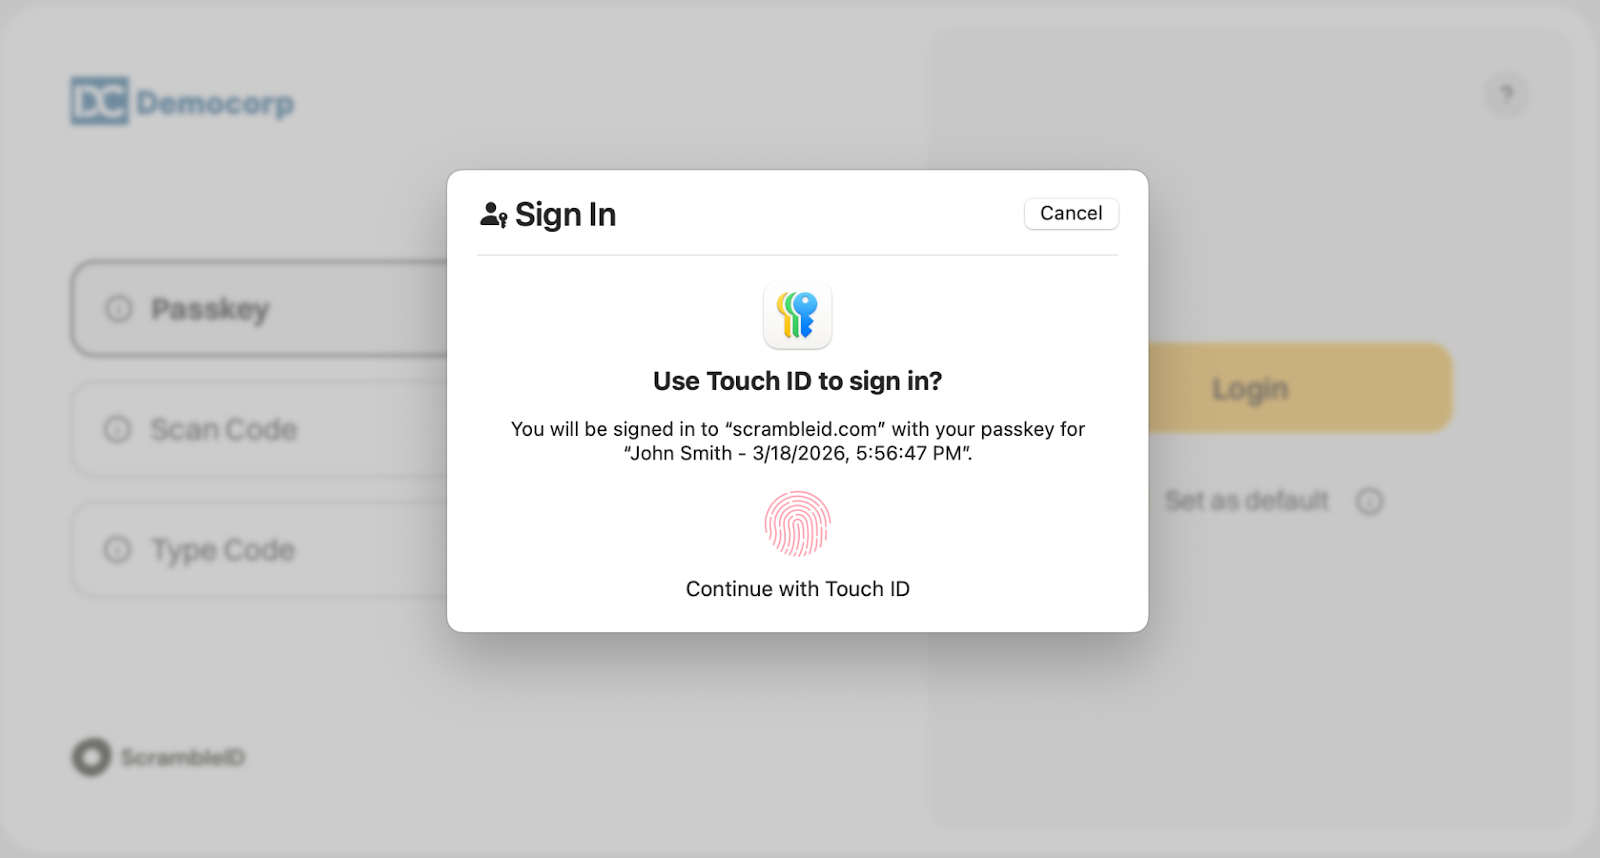
Once the Passkey is set up and chosen as your login method, if you select Set as default, then the next time you log in, the app will automatically prompt you with your Passkey.
Setting up Passkey on Mac OS
ScrambleID uses your mobile device to authorize Passkey login on your workstation. The Passkey itself is managed by your operating system (Touch ID).
In order to set up Passkey, tap the Setup button on the login screen.
Type the code displayed on the portal into your ScrambleID mobile app.
Enter the additional two-digit code into the mobile app, then click Verify.

Note: There are options on the system to set up a passkey of your choice for example your fingerprint, facial recognition, or PIN.
Setting up your Passkey using the fingerprint option:
Scan your fingerprint to Continue with Touch ID.
You will receive a confirmation on the portal screen that the setup is complete.
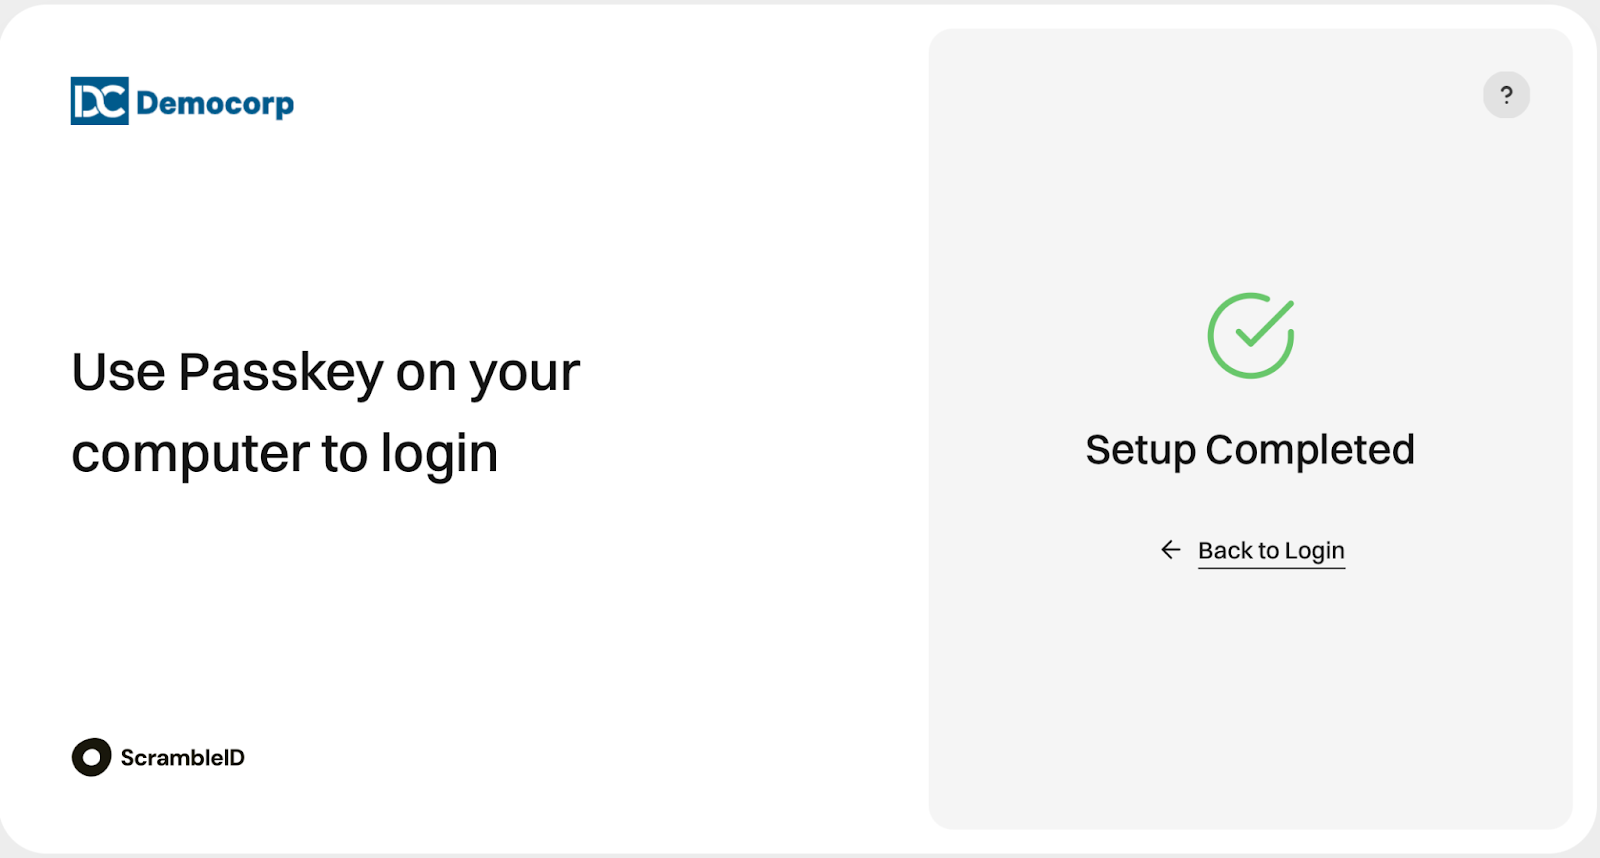
On clicking Back to Login, you will now be able to login using the Passkey set up on your laptop or computer.
Once the Passkey is set up and chosen as your login method, selecting Set as default will automatically launch the Passkey login window during the next login attempt.
The next time you log in, the app will automatically prompt you with your Passkey
Profile
Select the user icon on the top- right corner to get the Profile

From the Profile menu you can edit your phone number, view your login history, manage your profile, or change settings

Add profile picture
Click the + (plus) icon to add a profile picture. You can choose to either Take a photo or Upload from photos.

Use the sections below to explore options under History, Manage Organizations, Manage Devices, and Settings — or jump directly to a common task:
OR Click a topic below to jump to common tasks:
Profile > History
Tap History on the Profile menu to see all the time-stamped login events associated with each of your devices.

For each entry in the list, the device name, date, and time of day is displayed.
Reporting a device

If you see an entry you don’t recognize you can report it for further review by tapping the Question Mark Icon.
Tap Report to report a suspicious login.
Tap Cancel to return to the previous screen without reporting.
Profile > Manage organizations

To manage your organizations, tap Profile to access your Organizations.
From here you can add a new organization or delete an existing one. Your account can be associated with one or more organizations.
Note: The ScrambleID app is designed to let you manage devices separately from managing the organizations associated with your account.
Add an organization
To add a new organization, tap the Add Organization button at the bottom of the screen.
If you get an email invitation to ScrambleID from a new organization, open the app and enter your business email and the six-digit authorization code.

Delete an organization
To delete an organization, tap the options icon next to it and get the Delete option.

Tap Delete to remove this Organization.

Tap Delete to remove the selected organization.
Tap Cancel to return to the previous screen without deleting the organization.
Profile > Manage devices
The Manage Devices screen lists all of your currently active physical devices.
Note: A maximum of five devices can be associated with a single user account.

Device options
To manage the options for one of your devices, tap the options icon next to it. Two options appear: Delete and Edit Nickname
- From the dropdown, tap Delete to remove this device from your account following the instructions on screen
- From the dropdown, tap Edit Nickname to change the display name following the instructions on screen
Adding a new device
You can use your existing device to provide authorization codes for adding a new device to your account. Have both your new and existing devices handy.
To add a new device:
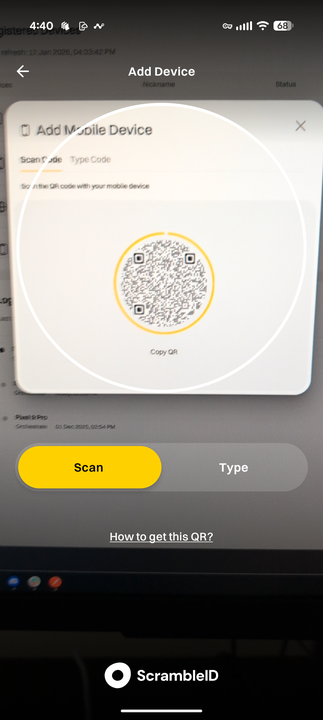
1. Tap the Add Device button on the bottom of the Manage Devices screen on your existing device.
2. The Add Device screen opens with a QR code displayed.
3. Tap Type Code to display the six-digit code instead.

Now open the ScrambleID app on your new/unregistered device.
4. Select Existing on the Welcome screen
5. The Existing User screen opens.

6. Under Do you have any other devices that are already enrolled with ScrambleID?, tap Yes.
7. The Add Device screen opens with QR scanning by default
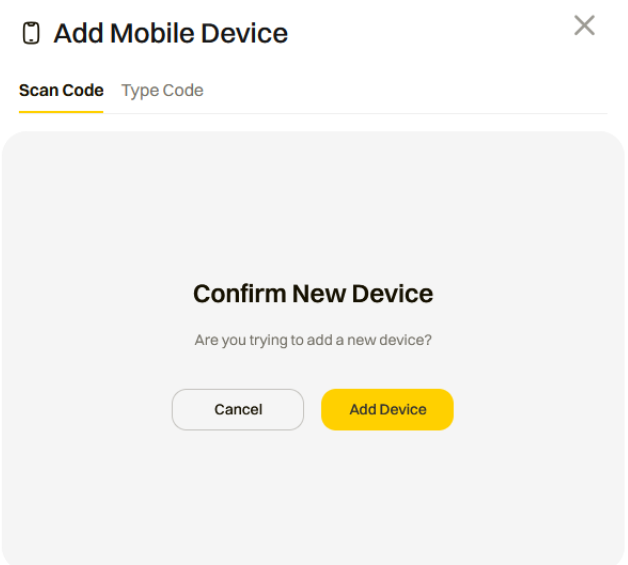
8. From this screen, scan the QR code displayed on your existing device or enter your Activation Code.

9. Your existing device asks you to confirm that you are trying to add a new device

10. Tap Yes to confirm, and the Device Activated Successfully message appears

Your new device is now authorized and can be used interchangeably with your existing devices!
Adding a new device using the self-service portal
You can add a new device to your ScrambleID account using your organization’s self-service portal.
Log in to the ScrambleID self-service portal provided by your organization.
1. From the Dashboard, select Add Device in the top-right corner.
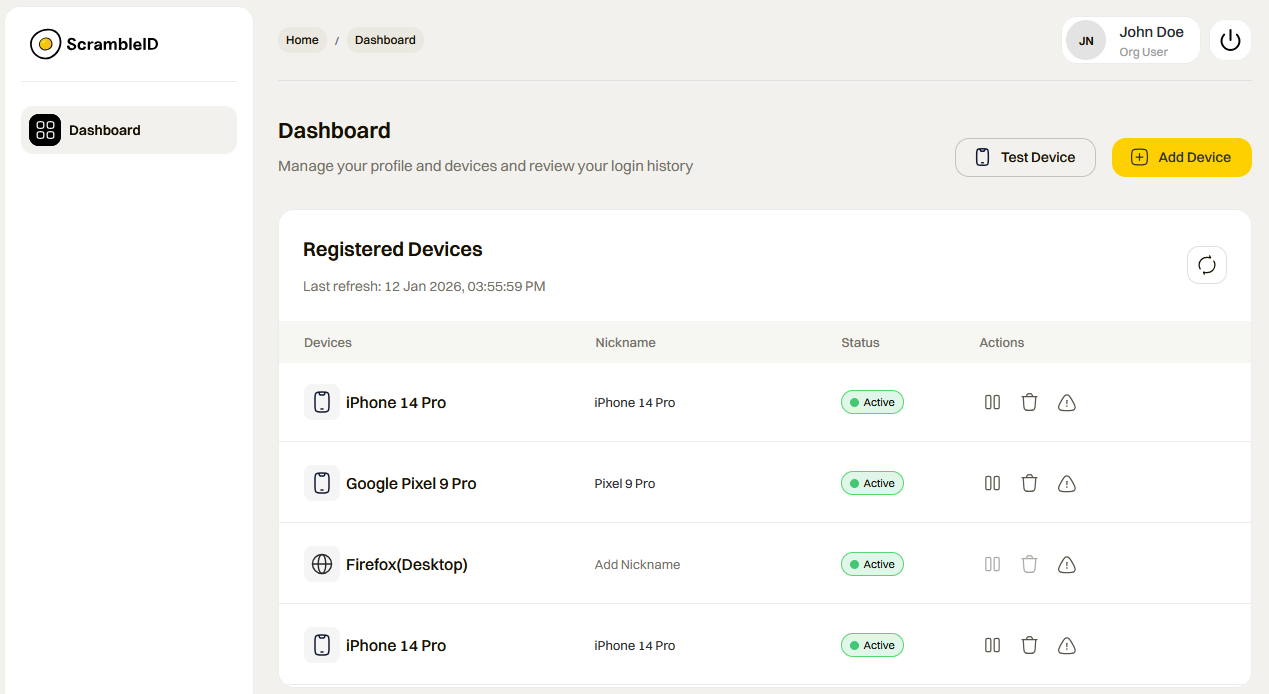
2. The Add Device popup opens and displays a screen to select a device type.
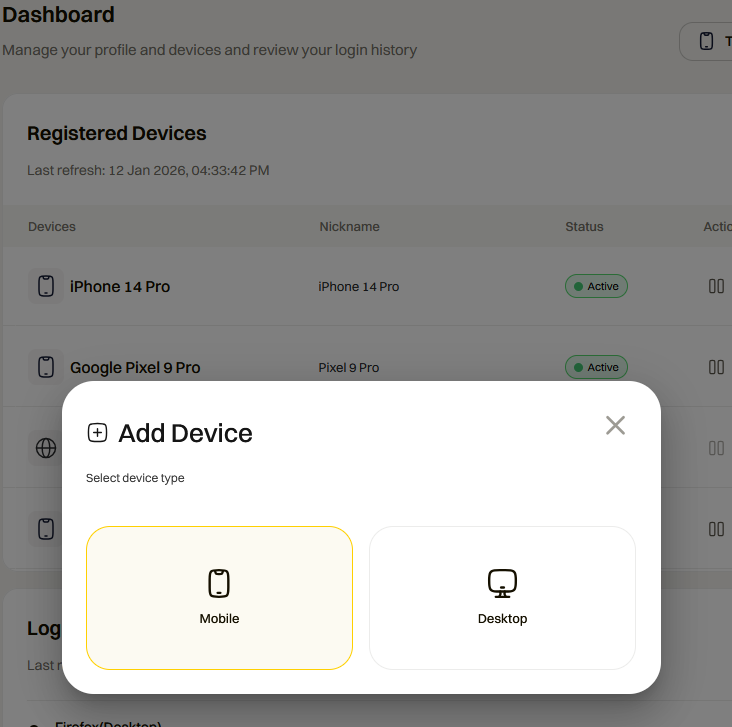
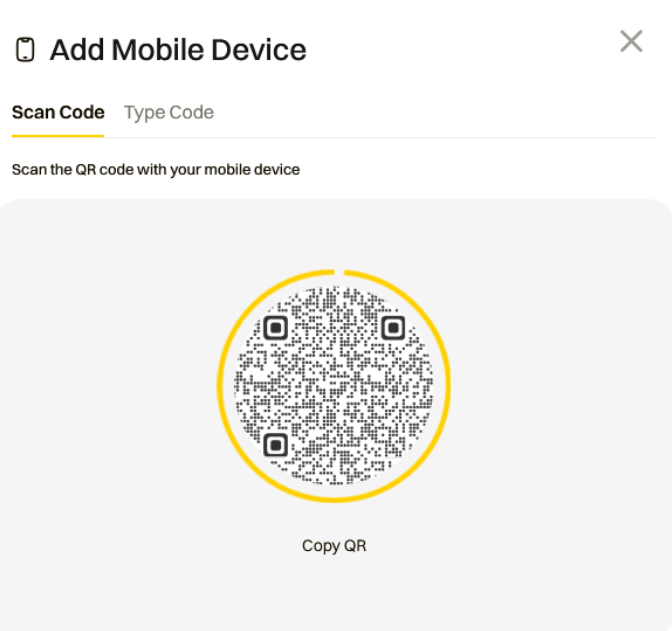
3. Click on Mobile and a QR code will be displayed.
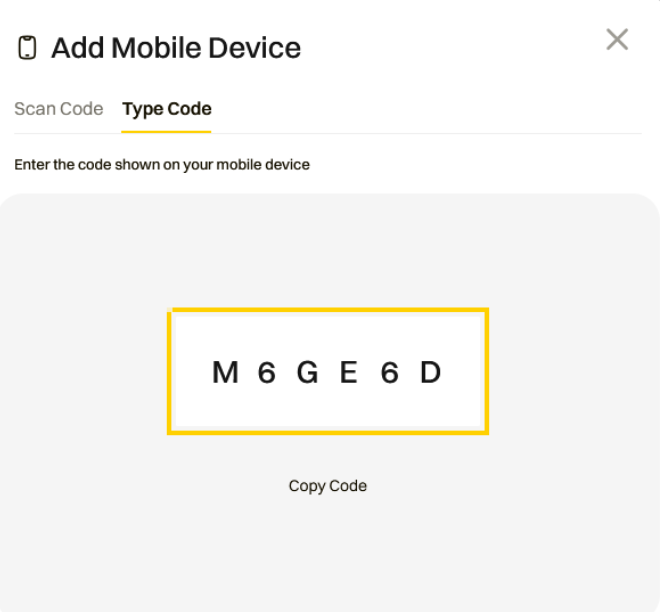
4. Alternatively, select Type Code to display a six-digit code instead.
On your new or unregistered device, open the ScrambleID mobile app and follow these steps:
5. On the Welcome screen, select Existing User.
6. The Existing User screen opens
7. When asked Do you have any other devices already enrolled with ScrambleID?, select Yes.
8. The Add Device screen opens with QR scanning enabled by default.
9. Scan the QR code displayed in the self-service portal, or enter the six-digit activation code.
10. The self-service portal will prompt you to confirm that you are adding a new device.
11. Tap Add Device to proceed. A Device Added Successfully confirmation message appears.

Your new device is now authorized and can be used interchangeably with your existing ScrambleID devices.
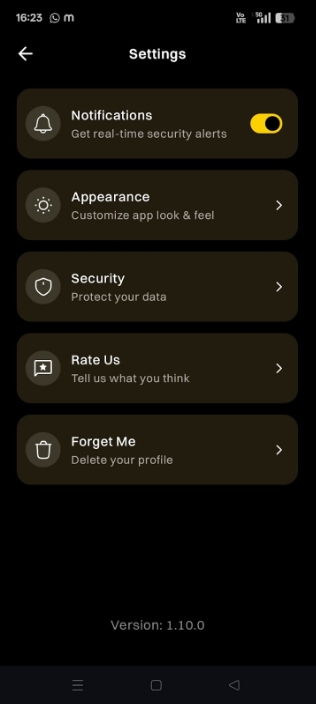
Profile > Settings

Settings > Notifications
After the registration, you will get an option to get real-time security alerts on your mobile device.

Select OK to stay secure with alerts.
2. After allowing alerts, the Notifications toggle will appear enabled within the Settings menu.
Select Maybe Later option, If you do not wish to receive notifications at this point. You can go to your Profile > Settings > Notifications and turn on the notifications anytime.
Settings > Appearance

When the System Default setting is turned on, the app follows your device’s default theme. If you turn off System Default, you can turn on the Dark Mode setting to enable Dark Mode or leave it off to stay in Light Mode.
Drag the Camera View Transparency slider to adjust camera transparency on the QR scan screen between 0 to 100%. The default value is 75%. Lower transparency improves QR visibility in bright environments.
Settings > Security
Tap Security on the Settings menu to open the Security options page.
It provides App security and Auth Security options.
Settings > Security > App security

Tap App Security on the Settings menu to toggle screen unlock on app launch.
Settings > Security > Auth security

Tap Auth Security on the Settings menu to toggle screen unlock on login.
Tap Forget Me from the Settings menu to delete both your profile and device data.
WARNING! Forget Me deletes all devices, organizations, and historical data associated with your account.
Settings > Forget me

When you tap Forget Me, an optional text field and a Delete button will appear. To proceed, tap Delete, and the Delete Account dialog will open at the bottom of your screen.

Tap Cancel to return to the previous screen without deleting any data.
Otherwise, tap Delete to permanently delete your devices and profile.
FAQ
Who do I contact if I have a question?
Your company’s help desk can always help answer questions, or provide a six-digit activation code to help you register for the first time.
What if I get an error during activation?
Ensure that the business email and activation code you entered is correct, and retry the operation. Contact your company’s help desk if the error continues.
Can I use more than one device to access the same organization?
Yes. Once you register, you can use the registered device to add more devices. A maximum of five devices is supported per user.
Can I use a single device to access multiple organizations?
Yes, you can use any of your devices to access all organizations you have added to your profile.
Why does ScrambleID ask for my alternate email?
A user can have multiple organizations associated with them. Alternate email is used by ScrambleID to notify users of any account changes that are not organization specific, rather related to the ScrambleID user profile itself. An example would be add/remove devices.
I lost my only registered device, how do I register a new device to my ScrambleID profile?
Contact your manager or call helpdesk and get an activation code. Register on your new device using the Existing option and the activation code provided by your help desk.
Will uninstalling the ScrambleID app on my device delete my ScrambleID profile?
No, your ScrambleID profile is not deleted. If you have any other devices with ScrambleID installed, you can always add this device back to your profile using an existing device with ScrambleID on it.
Glossary
Activation code
Your activation code comes in an invitation email as a six-digit code.
Device
Any smartphone or tablet running iOS or Android with the ScrambleID app installed. Typically it’s something portable, with a built-in camera to use when scanning a QR code is an option for activation. But since you can always type in a code instead of scanning, any portable device with an Internet connection is fine.
End User
The end user is you! They’re the person using the ScrambleID app to access applications instead of having to remember and enter passwords.
Forget Me
A function in the ScrambleID app that deletes all your devices and organizations.
Six-digit code
The alphanumeric code that you can type into the ScrambleID app for authorization and activation, even when a QR code is also provided.
Contact us
Need more help?
Your organization’s help desk can help resolve issues, assist in new registration, or provide an activation code for new and/or replacement devices.
Please also read through our Terms of Service and Privacy Policy.